How to create your first Facebook Ad campaign: a step-by-step tutorial

Everyone uses them these days: entrepreneurs, freelancers, businesses, celebrities, even politicians.
We are, of course, talking about Facebook advertising campaigns, and using them for a variety of purposes, from growing your business to building the awareness of your brand.
This article is for you, if you’re looking to create your first Facebook ad campaign, especially if you’ve created your own website using Mozello.
Today, we’ll show you the A to Z of how to create your first Facebook ad campaign, from creating and adding a Facebook Pixel to your Mozello website or online store, to preparing the text of the ad and choosing the images.
First, let’s make sure you have two critical things:
- A website or an online shop
- A Facebook page of your company or organisation
If you’ve checked both of these boxes, let’s continue!
Step 1. Business Manager and Ad Account
First, you will need to create a Business Manager account and link it to your Facebook page. The next step is to create an Ad Account.
Open Facebook Business Manager, click on the Create Account button and follow the instructions on the page.
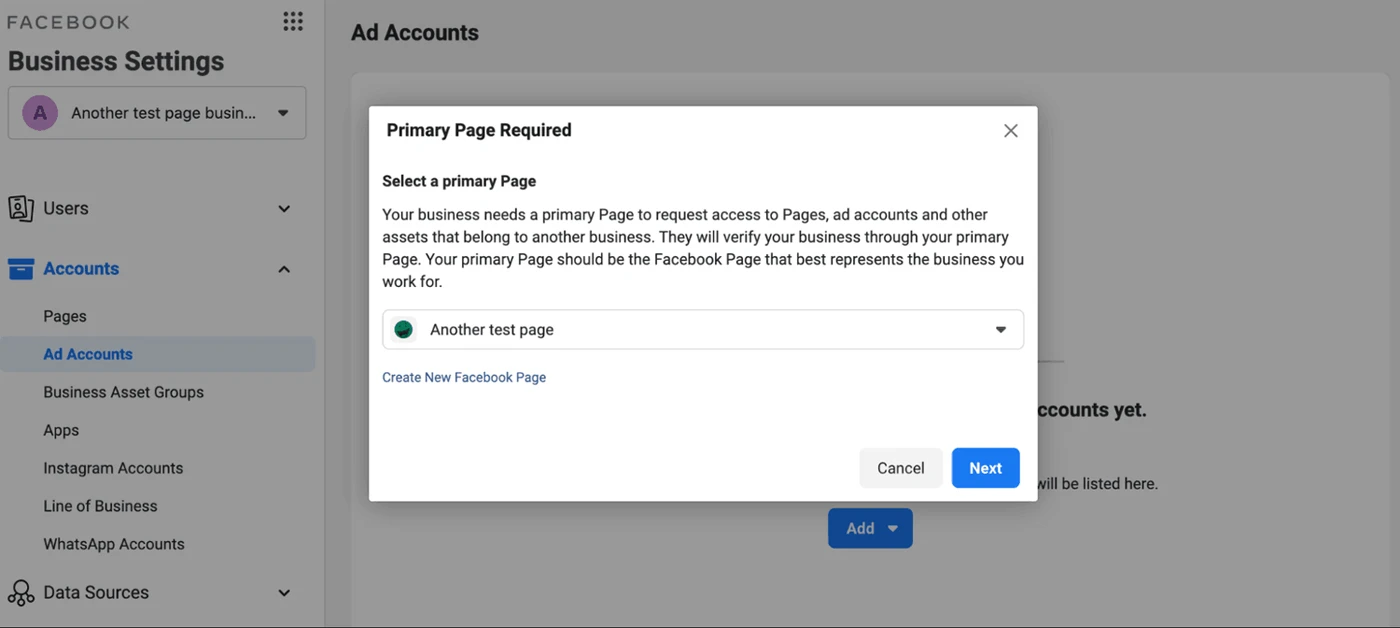
Once your Business Manager account is ready, go to Accounts in the toolbar on the left and open Pages. There, add the Facebook page you want to advertise. Next, open Ad Accounts and create a new ad account for your company page.
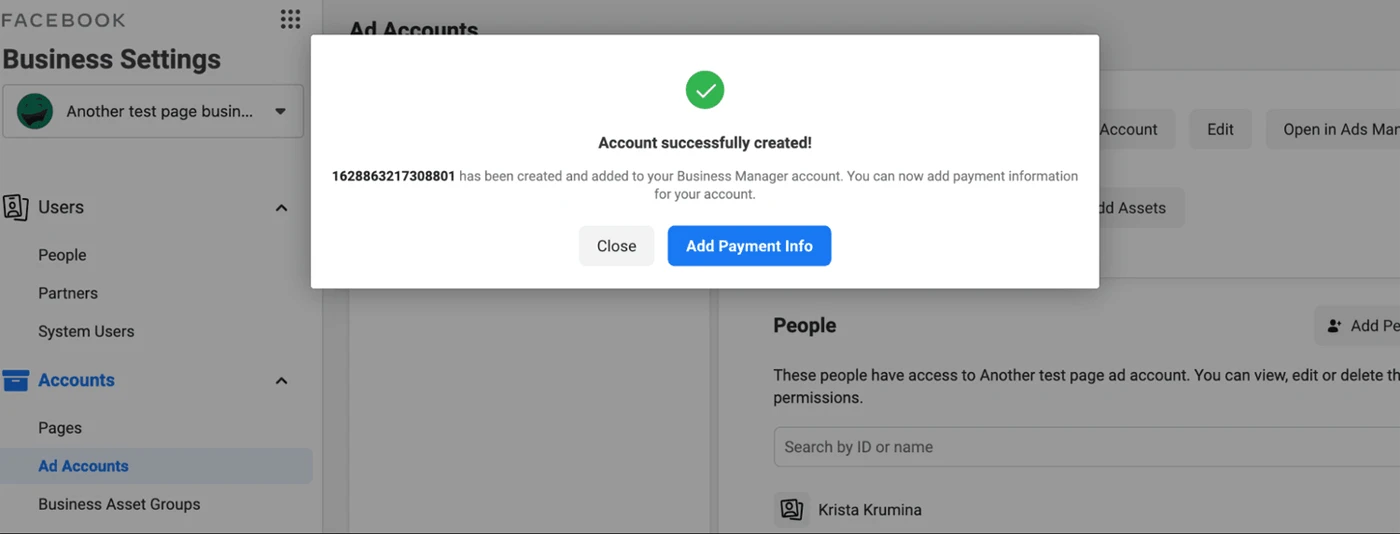
Once your account is created, you will be given the option to add payment details. Here you will have to add your payment card or PayPal account details.
Step 2. Add Facebook Pixel to your website
Facebook Pixel is a small piece of code that tracks activity on your website. This information is then passed on to Facebook, which assesses the results and effectiveness of the specific ad.
You can run an advertising campaign without this pixel, but this is not recommended. Without it, you won’t be able to analyse how successful your ads have been, and if they are achieving your goals.
To find the pixel for your page, go to Business Manager, then Business Settings — Data Sources — Pixels. Add a new pixel and click the Continue button. Then, if you are a Mozello user, you have two options:
First: Simply copy the Facebook Pixel ID (the 15-digit combination you’ll see under Pixels in Business Settings, section Data Sources).
If you have a website or an online shop created using Mozello, just go to the Settings section and copy your Facebook Pixel ID into the Facebook Pixel ID field. Save your changes!
![]()
If Your website was not created using Mozello, you can choose to set the pixel manually and copy the pixel code into the HEAD section of your website. You may need help from the developer of your website.
![]()
Now go back to Facebook Business Manager and check if the pixel is active and is tracking everything happening on your page.
Important: It will take Facebook a few minutes or hours to register that a pixel is working.
![]()
Step 3. Create your first advertising campaign
Campaign goal
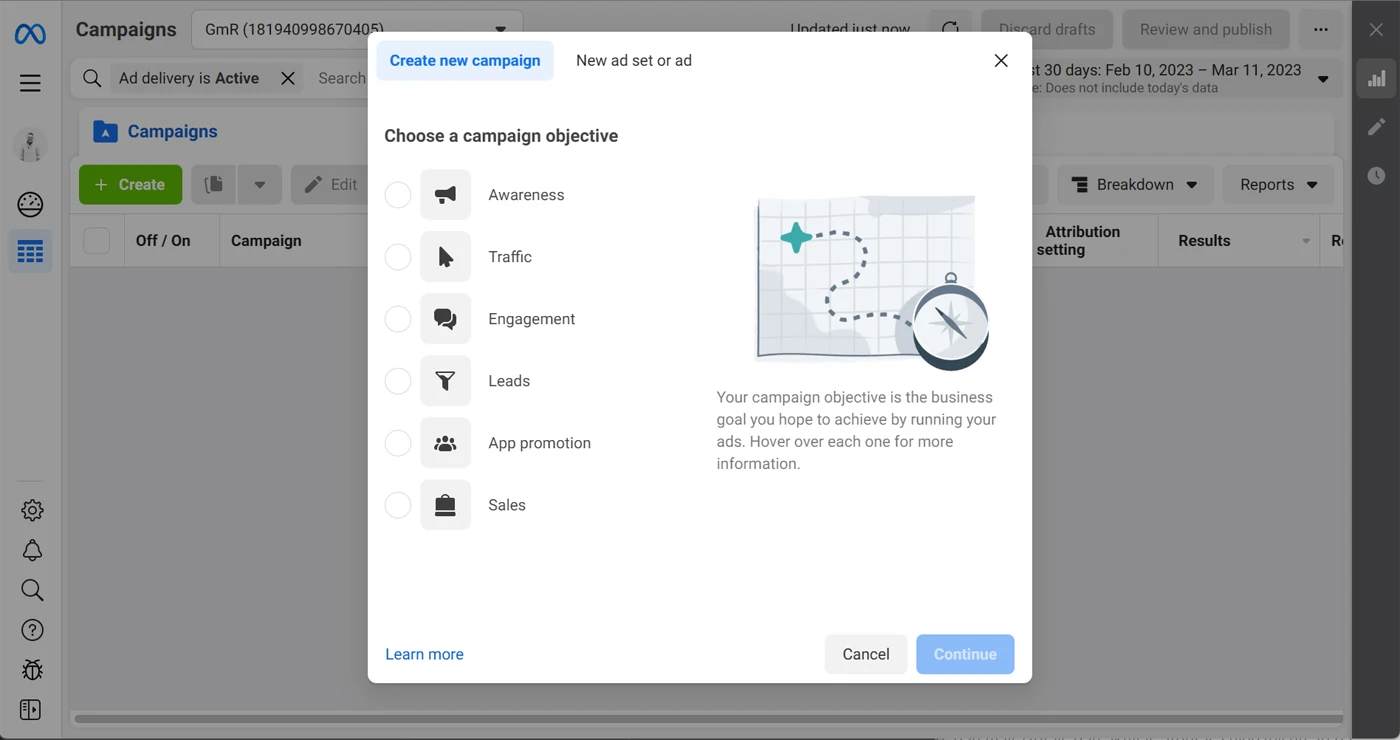
It’s time to take the bull by the horns and create your first Facebook campaign. To do this, go to Ads Manager and click Create.
You will first need to define what your campaign is for. There are three types:
Awareness
The priority of this campaign is to reach as many users as possible. Although your ad will be seen by many people, this type of campaign should not be expected to suddenly create an explosion of sales or clicks, as its main purpose is to simply show up in front of your target audience’s eyes.
Consideration
The focus of this campaign is to reach people whose activity on Facebook shows that they might be closer to making a purchase and are looking at different options. For example, if you offer garden products on your website, these people would be those who regularly read articles about gardening.
Conversion
This campaign focuses on conversion rates, such as the number of purchases in your shop. These ads will not be shown to every single Facebook user. The ad only shows up for people closest to making a purchase, such as those who have already made a purchase by clicking on a Facebook ad.
Important: You may be thinking that conversion is definitely the best thing to look for. It’s worth nothing though that Facebook requires 15–25 conversions (e.g. purchases) per week for a campaign to be fully optimised. If your company still can’t achieve these results, it might be a better idea to choose a different goal, like attracting website traffic or something else. Also, if your company is just taking its first steps and hasn’t yet gained popularity, the best strategy might be to start with an awareness campaign for better brand awareness, and only then focus on conversion.
Choosing the target audience
When choosing your target audience, you select specific groups of people to show your ad to. This step usually helps reduce costs.
Start narrowing your target audience by demographic parameters, like location, age, or gender. You can then select more specific parameters, such as:
- Demographics — you can choose, for example, to advertise your product to people with a university degree in a certain field, a certain relationship status, or a particular job title. It’s worth mentioning here that these data are based on the details that people say about themselves in their profiles, but since many choose not to disclose this information, they will not be included in your target audience. Also, because the job title can only be in English, this type of targeting may be less effective in Latvia.
- Interests — you can choose to show your ad to people whose interests are aligned with your business. For example, if you offer personal trainer services, create a target audience with interests in body building, sports, and organic food.
- Behaviour — choose to show your ad to people who behave in a certain way. For example, if your product is an app available in Apple Store, the target audience will certainly be iOS users. Or, if you want to reach businesspeople, target those who maintain the Facebook pages of companies (assuming these are pages of the companies they own).
Lookalike audiences
Another option is to create a lookalike audience. This means that Facebook will look for its other users who are similar in their parameters to people who have previously shown interest in your business (i.e. previous buyers, website visitors, newsletter subscribers, Facebook followers, etc.).
To create a lookalike audience:
Open Business Manager and go to the Audiences section, where you will need to select the Create Lookalike Audience option. Next, you select Create New Source, and check the Custom Audience box. Here, you will have to choose the source for your existing target audience.
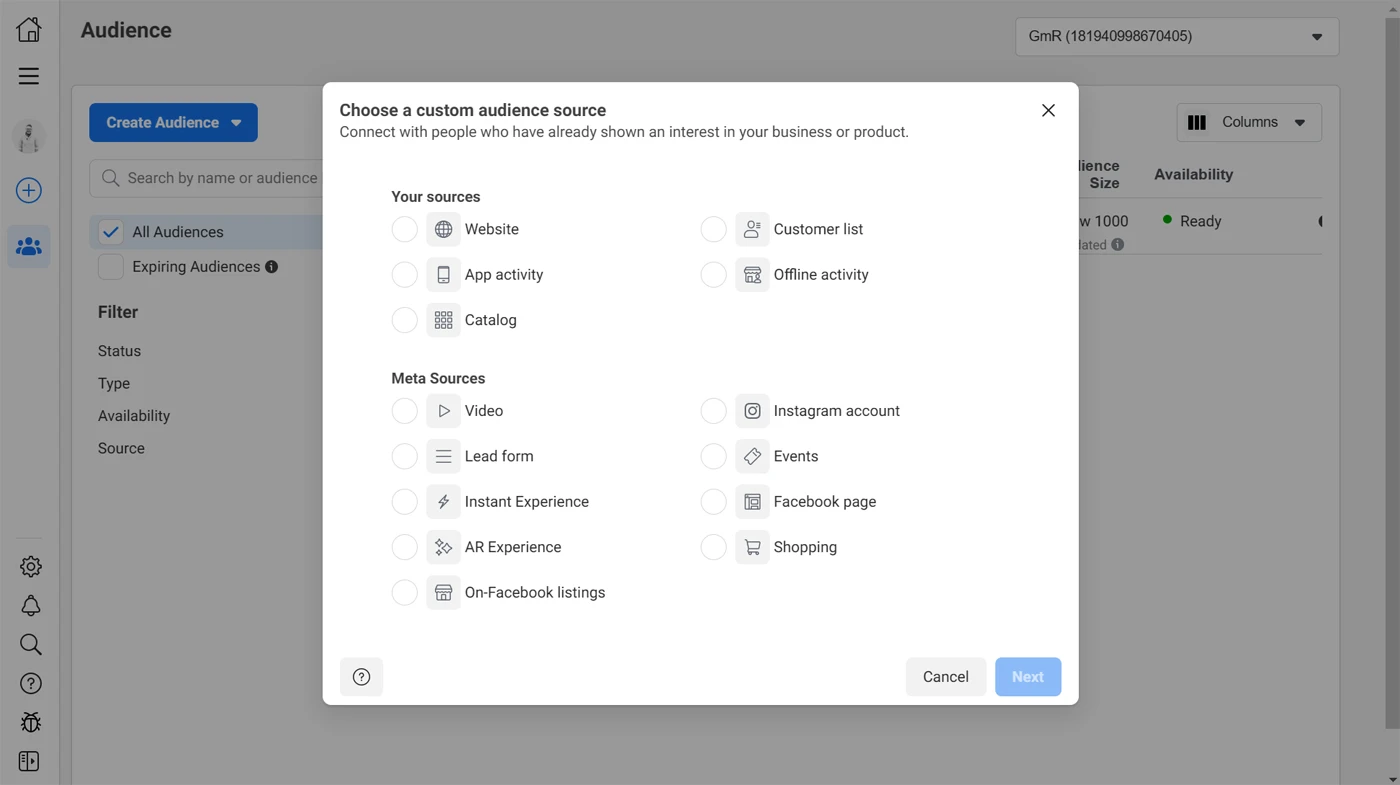
For example, if you select Website, the lookalike audience will be set up based on the previous visitors of the website. If you choose Facebook Page, the lookalike audience will be based on your page followers. If you have a list of your previous clients’ e-mails or newsletter subscribers, you can also select the Customer List option.
Once you’ve made your choice, you can narrow it down to:
- Locations (e.g. people living in a particular country)
- Target audience size (you can choose the size of the target audience: the lower the percentage value, the more relevant users will be selected)
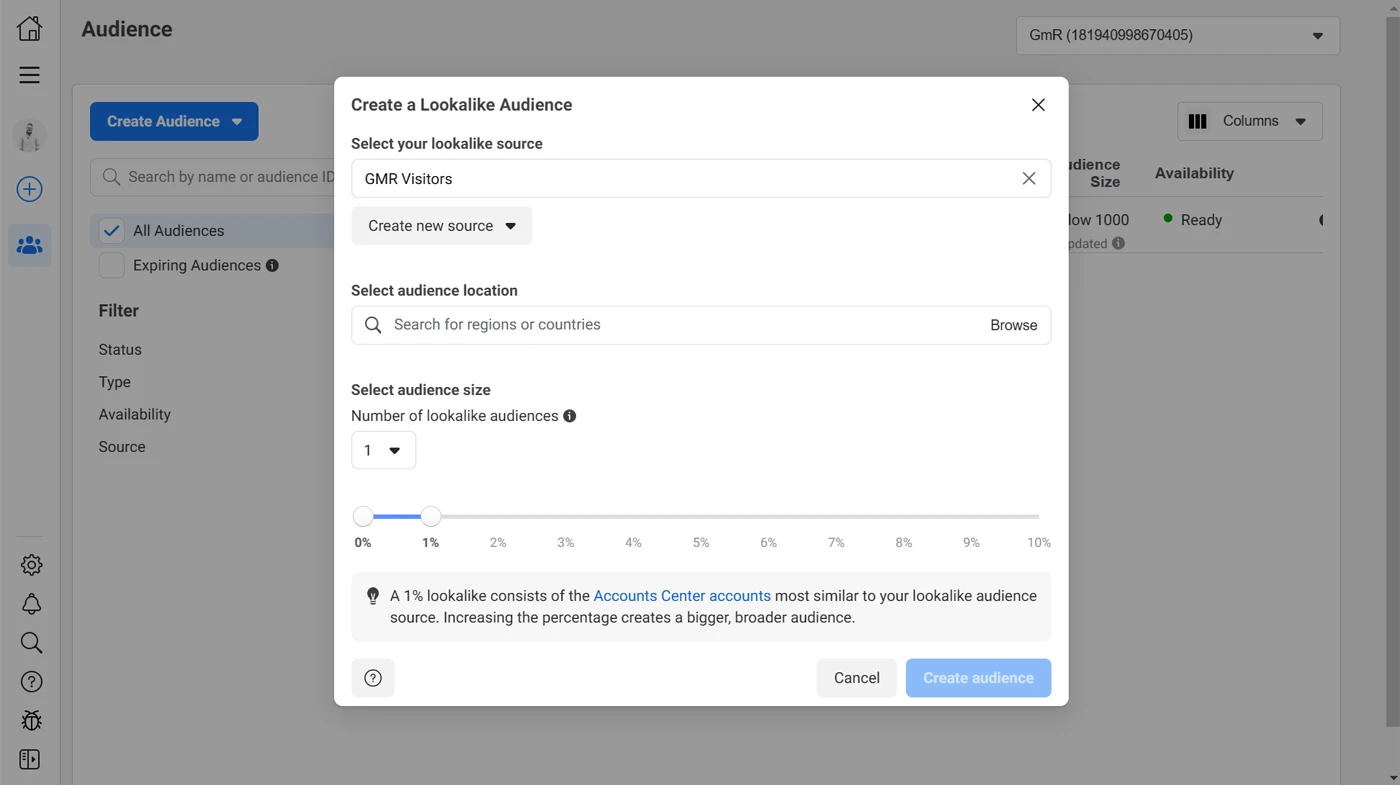
Once you’ve created your lookalike audience, you can select it when setting up your campaigns: they’ll show up in the Custom Audiences section.
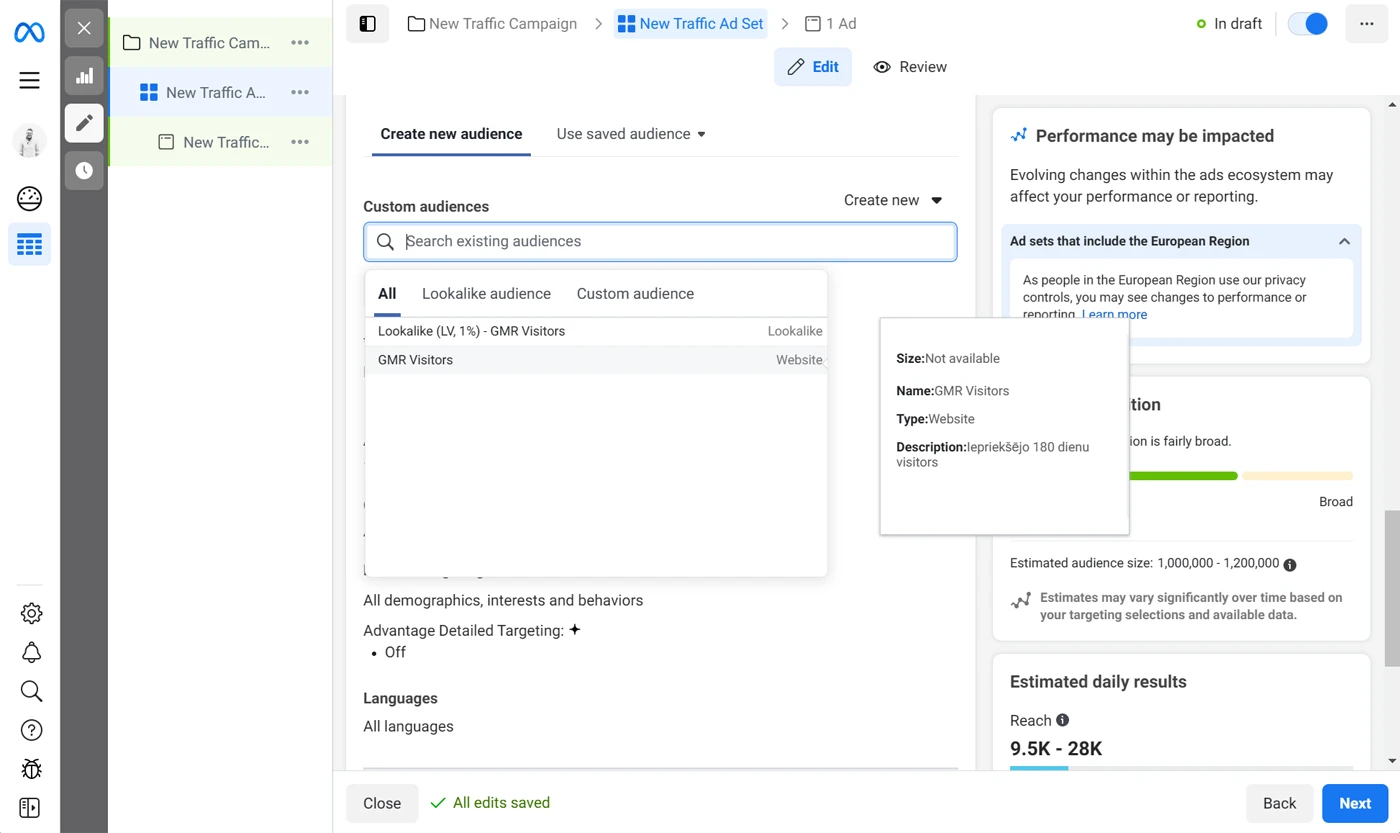
Don’t forget that you can combine different audience targeting options to create as detailed an audience as possible! For example, you could try narrowing down the lookalike audience by including additional interest and demographics criteria.
Retargeting
Retargeting is a very simple and effective tactic, which involves showing your ad to people who have shown (even the slightest) interest in your business. These can be people who follow your Facebook page, visitors of your website, people who looked at specific product pages, or people who have added a product to their basket but have not completed their purchase.
This is the most valuable audience, as these people have been closest to making the decision to buy. And you can create a special ad just for them.
First, you’ll need to create a custom audience that includes all these people. Go to Audiences and select Create Audience. Just like with lookalike audiences, you will need to create a customised audience first.
Let’s say you want to create a retargeting ad for people who have viewed your contact details page.
- Choose Website as your source.
- Select People who Visited Specific Web Pages from Events to indicate people who have previously visited a specific page
- Enter the inclusion period: the number of days since the person last visited the page (e.g. contacts)
- Choose URL Equals and copy the link to the contacts section of your shop.
- Scroll down the page until you see the Exclude People field, where you can exclude a specific part of the audience if you wish.
Finally, click Create Audience and you will have successfully created the target audience.
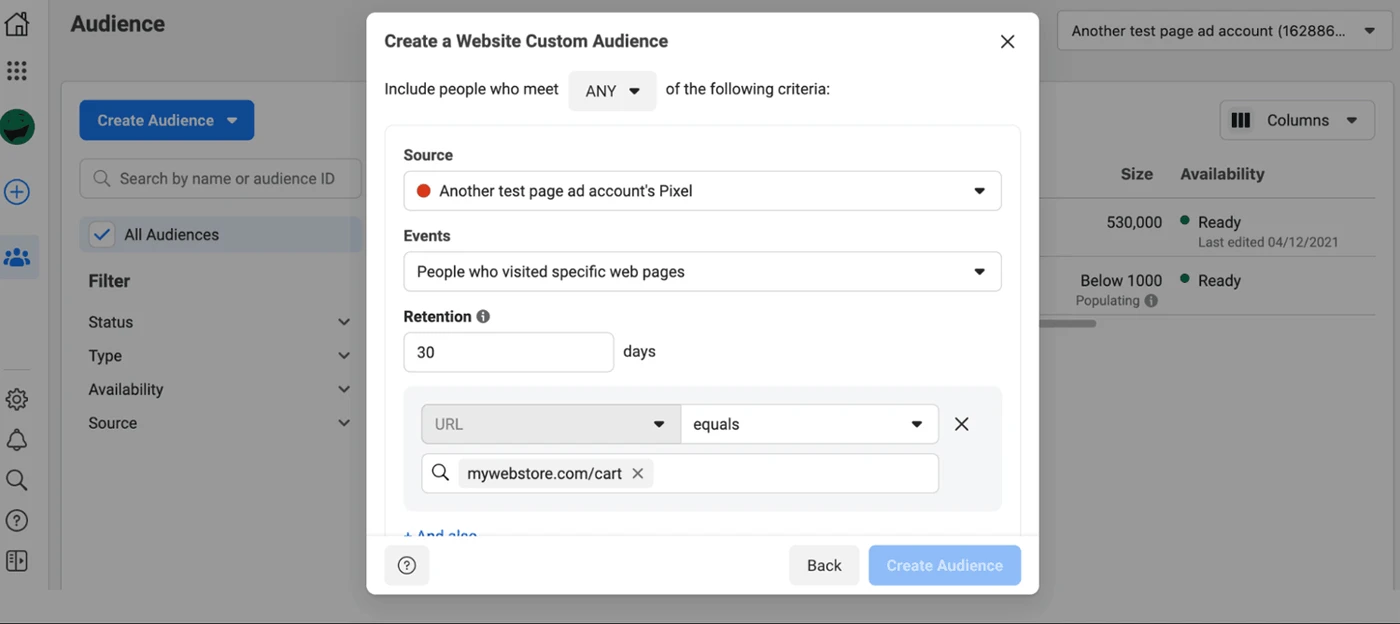
Go back to Ad Manager, and now, whenever you create a new ad campaign, you can select this audience.
Budget
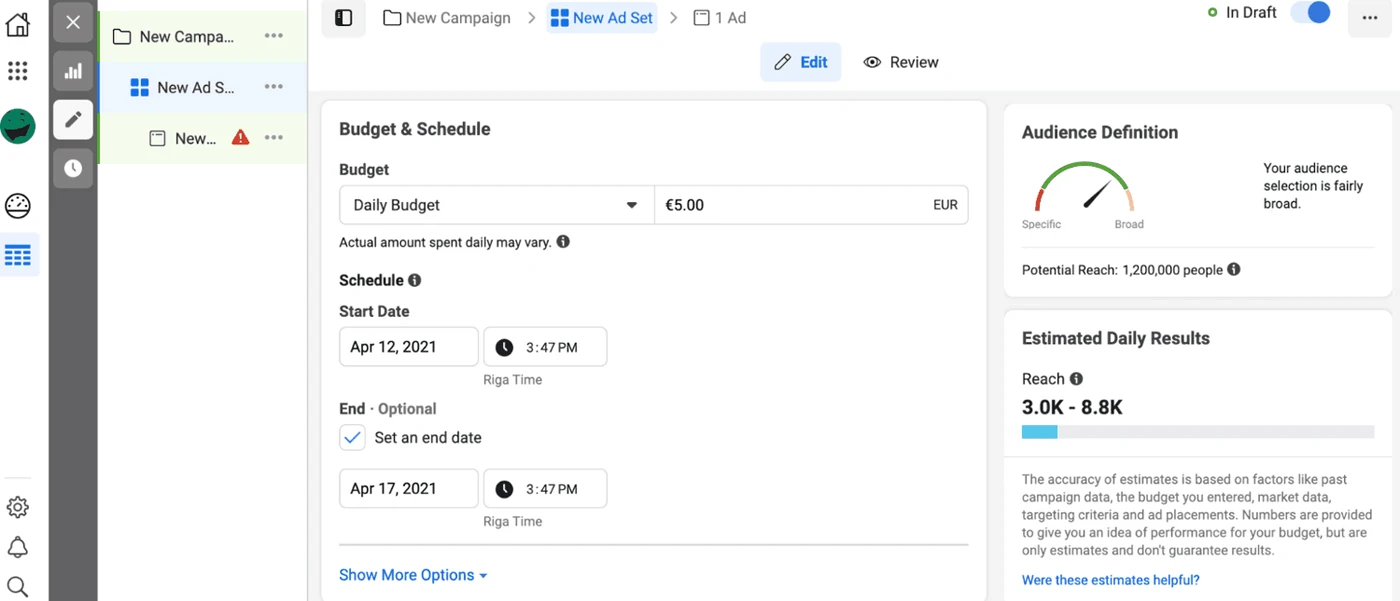
Basically, your advertising budget will depend on how much you are willing to spend on advertising. But there are a few important factors to keep in mind.
First of all, ads optimised for awareness or consideration cost less than conversion ads.
The reason is simple: people who are ready to make the purchase are more valuable than those who want to just take a peek. Spending €10 on an awareness campaign is likely to get your brand some results in terms of visibility, but investing that amount in a conversion campaign is likely to be as good as dumping the money down the drain.
Second, the budget has to be big enough for Facebook to be able to play with it.
This means that Facebook will spend smaller amounts at first, trying to find the right target audience, before launching the campaign in full swing. It goes without saying that €10 is usually not enough for a week-long campaign, if your campaign is to achieve good results.
Step 4. Visual design of your ad
We’ve finally come to the creative part of this tutorial. Let’s first focus on the visual design of the ad. While good advertising texts are very important, we all know that a picture says more than a thousand words.
First, the (supposedly) obvious:
Unless you have zero choice, avoid stock photos. Their biggest disadvantage is that a huge number of companies use them, which can lead to a sensitive situation where two different companies are marketing two different products using the same image. (Yes, we have seen this out there ourselves).
Try one of these ideas, we guarantee they’ll work much better than soulless stock images:
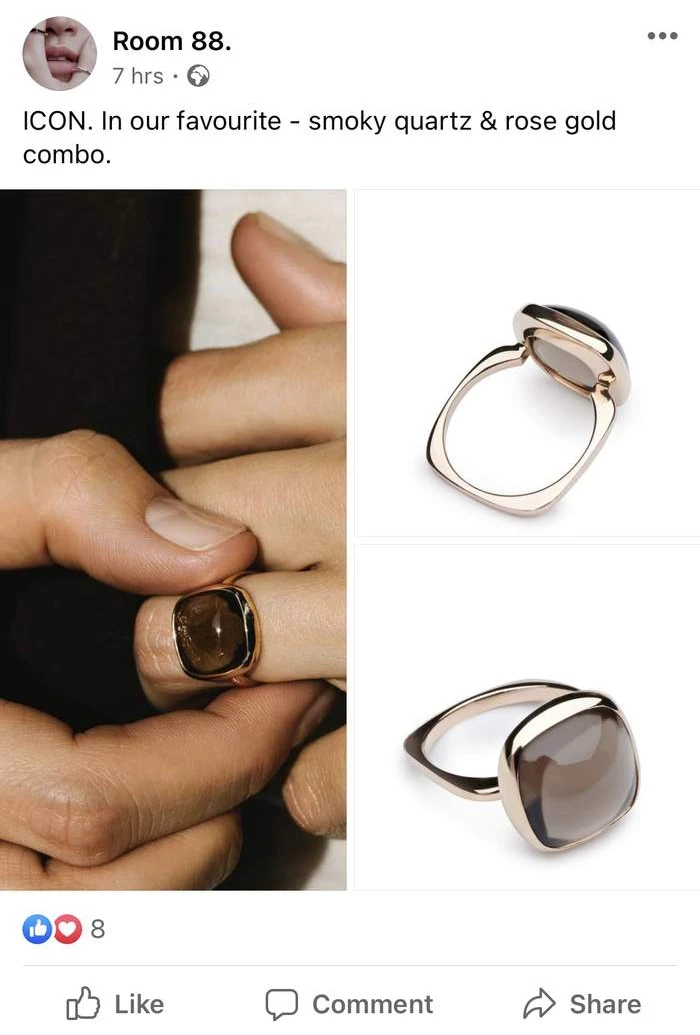
Photos of your product
The fact that someone has clicked on a picture of your product, it means they like the picture.
Product video
Almost the same ideas as with photos, except more effective. If you own an online shop, it’s an opportunity to showcase your products in all their glory. If you’re a musician, make a video of yourself playing your music.
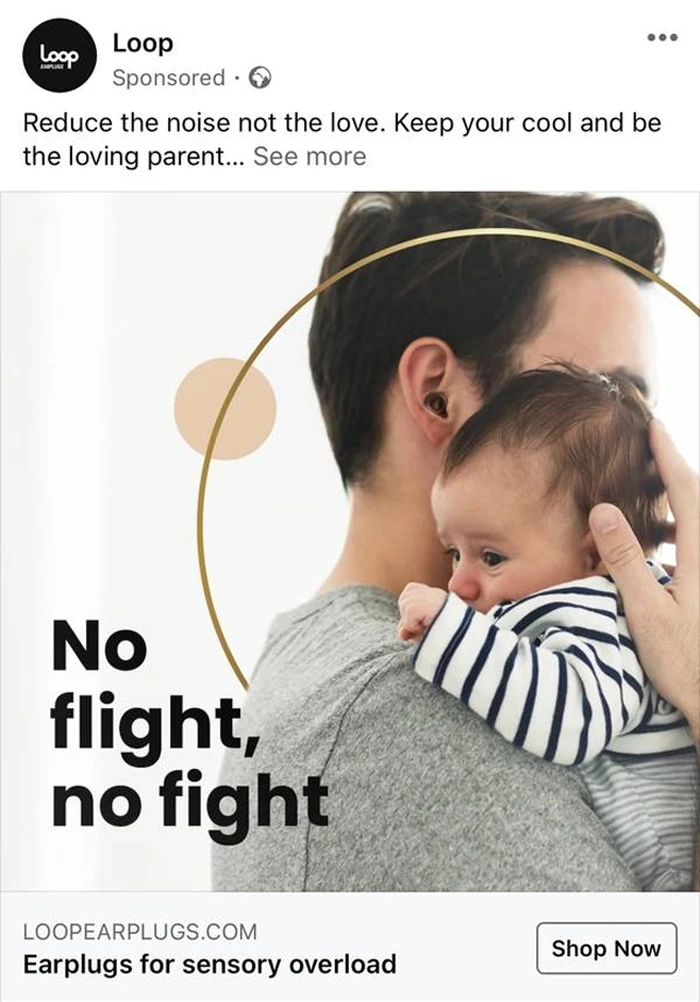
Texts
Another way to convey a message is to use words, literally. Choose a pretty font and enter your message on top of a single-colour background, or a background with muted colours.
Show yourself
Do you services? If you use a photo of yourself, you let the client see that there is a real, living person behind the ad.
Icons
While we say no to stock photos, we do give the green light to stock icons: feel free to use them to make your own custom ones.
![]()
Brand logo
If you don’t have product pictures or videos available, use an image with the brand logo against a simple background to help it stand out.
Tip: You can use one of the free tools available for creating your ads. Canva is one example, with a wide variety of pre-made templates that can help you create beautiful visuals quickly and easily.
Step 5. Preparing the text of the ad
The last step is to prepare the texts for the ad. The texts for an ad show up in three places: the primary text is at the top of the ad, then there is the URL heading, followed by the URL description, which you can add if the ad includes a link to your page (and it should).
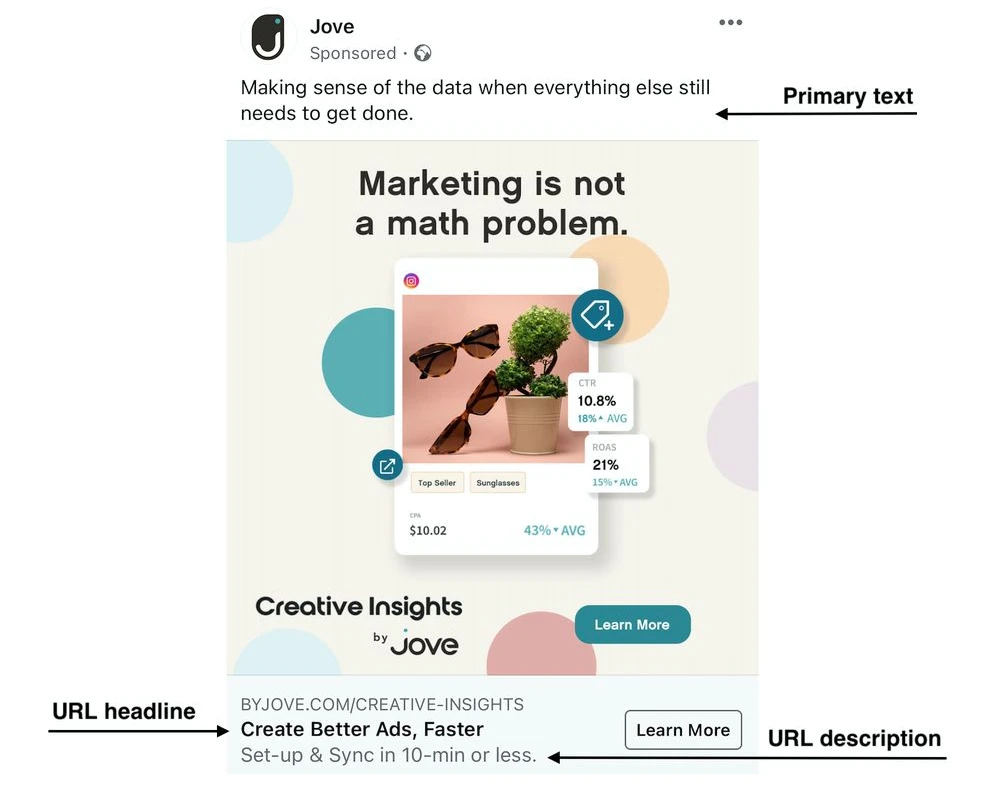
Sadly, we can’t give you the magic formula for writing successful ad text, because none exists. You will have to try and test again and again until you find what actually sticks. However, here are a few well-proven tips:
- Appeal to the reader — if your target audience is people interested in dogs, use the word ‘dogs’ in your ad text.
- Quote what your clients say and post testimonials — this helps build trust in your brand.
- Use emoji to draw attention, but only in moderation
- Don’t forget to include one clearly stated call to action — what is it that you want the reader of the ad to do? Write it down!
- Try not to get too carried away with creative and complicated language. Be clear and direct: remember that people don’t want to waste their time reading ads, and will be much less inclined trying to unpack your metaphors or navigate your jargon.
- Use numbers — they make ads look more fact-based, for better credibility.
Once the texts are ready, find the Publish button, and your first Facebook ad is now out in the world.
And to end this, here’s the key to success
Let us share one secret to making your campaigns a success that we haven’t talked about yet. And it is:
never stop trying new things: new audiences, new budget settings, new visuals, and new ad texts.
Even if you’ve tried something and failed, like uploading an image that no one noticed, know that it’s always worth trying again, with a different audience, image heading, or something else. The idea of something that is useful for everyone being at the same time useful to no one, certainly applies to advertising.
The more you experiment, the bolder and more creative your Facebook ads will be, and the better results you’ll get in the end.

